Peteohms
Super Serious Member
 Kitfox III
Posts: 113
|
Post by Peteohms on Aug 27, 2012 8:58:32 GMT -6
I bought a Skylite project from a friend with fuselage and tail feathers welded. I'd be interested in exchanging help and ideas with others. This would be a great place for it
|
|
|
|
Post by raceair on Aug 27, 2012 19:22:57 GMT -6
Pete.......n3480h, (Tom) is a member of SAA and this forum, and he has a Skylite, and so do I.....I still have the original prototype...Ed
|
|
n3480h
Accomplished Member
Posts: 78
|
Post by n3480h on Aug 28, 2012 16:55:06 GMT -6
Thanks Ed, Hi Pete. My Skylite is more of a re-builder, after 5-6 owners all added 20-25 pounds. I am in the process of trimming 100 pounds off it, seems someone was trying to turn it into a cross country marginal VFR bird, lol. But it has flown and did ok even with the extra weight. With the 100 pounds removed it promises very good performance. I'll try to post a pic in a follow on thread, but Pro Boards kicks me off when I try that.
Pete, got pics?
Tom
|
|
n3480h
Accomplished Member
Posts: 78
|
Post by n3480h on Aug 28, 2012 17:02:55 GMT -6
Sorry Pete, the Angy Blue Bear at Pro Boards kicked me off again when I tried to post the pic. Not sure why, the pic was only a 325 Kb jpeg? In any case, if I can help you with your's let me know. I'm getting to know mine intimately.
Tom
|
|
Peteohms
Super Serious Member
Kitfox III
Posts: 113
|
Post by Peteohms on Aug 29, 2012 7:29:11 GMT -6
Tom and Ed, I'd post some pictures if I could. Don't know how yet. My Skylite is completely welded minus a few tabs etc. I plan to put a Scott Casler 45 HP 1/2 VW on the nose. I'm doing a major annual on my Kitfox so havent had time to work lately. I'm in the process of making the false ribs. I'm using aluminum flashing to play around til I get my process down. They seem strong enough so maybe I'll just use the flashing to make the false ribs and the angle to support the rear of them. Making the false rib nose attach piece too. I have wing tanks so I'll have to get Ed's input on moving the inner most wing drag braces out to make room for the tanks.
|
|
n3480h
Accomplished Member
Posts: 78
|
Post by n3480h on Aug 29, 2012 16:31:55 GMT -6
Pete, do you have only wing tanks, or do you have a 5-6 gallon tank between the rudder pedals? Mine has the tank between the rudders AND a 5 gallon wing tank between the wings. I can't imagine flying any UL for so long as to burn 10-11 gallons, but that's just me. I can tell you one thing for certain, keep the Skylite as light as possible if you want good performance. At more than 100 pounds overweight mine climbs very slowly at full throttle, and I would not think of flying today (100° with a Density Altitude of about 5 miles  ). Tom |
|
Peteohms
Super Serious Member
Kitfox III
Posts: 113
|
Post by Peteohms on Aug 29, 2012 17:54:41 GMT -6
Tom, I will install a 1 gallon header tank under the dash just to bring the two tanks together. I got the tanks with the project and I do attend a bunch of fly-ins. Don't have to fill them for every flight.
I used to fly a Quicksilver ultralight and carried a 3 gallon gas can behind the seat in case I needed to hike to a gas station. I probably used 8 gallons a few times so the wing tanks would come in handy.
I'm interested in the details on your wing tank installation. What mods you had to make, etc.
|
|
n3480h
Accomplished Member
Posts: 78
|
Post by n3480h on Aug 29, 2012 20:53:26 GMT -6
Pete, the mods are on-going. Ordering materials tonight to return the main gear to plans configuration. The wing tank was a previous owner's work. It is airfoil shaped and mounted in the space between the wings, under the wing joint fairing. I've managed to scrape my skull on its outlet plumbing more than once. Its coming out. That tank and its hardware must weigh 10-12 pounds. Looking at the welded boot cowl tank and the pounds of hardware that mount it, it is about to be replaced with a 7 gallon poly tank.
The front of this Skylite was just fugly. Rather than form a proper boot cowl as shown in the plans, the builder just sheeted the wedge shaped structure. The "nose bowl" was just a flat sheet. That's all being replaced this week with a rounded boot cowl, new rounded windscreen, new engine cowl top hinge and hinged panels, and a light weight proper nose bowl in fiberglass. It will look much more like the plans cowl.
The breakroom chair seat (no, REALLY!) will be replaced with a super light carbon fiber seat pan and back, and a little padding. I've replaced the plywood instrument panel with one formed of carbon fiber. Basic instruments + CHT/EGT. And, a pair of 2 ounce strobes that I build myself, so others will have a better chance to see me.
It'll fly again next spring, and I'll have all work completed by next fall, including all new fabric and paint. Adding lightness.
Tom
|
|
Peteohms
Super Serious Member
Kitfox III
Posts: 113
|
Post by Peteohms on Sept 5, 2012 5:40:18 GMT -6
Tom and Ed, I'd post some pictures if I could. Don't know how yet. My Skylite is completely welded minus a few tabs etc. I plan to put a Scott Casler 45 HP 1/2 VW on the nose. I'm doing a major annual on my Kitfox so havent had time to work lately. I'm in the process of making the false ribs. I'm using aluminum flashing to play around til I get my process down. They seem strong enough so maybe I'll just use the flashing to make the false ribs and the angle to support the rear of them. Making the false rib nose attach piece too. I have wing tanks so I'll have to get Ed's input on moving the inner most wing drag braces out to make room for the tanks. Some not very good pictures here of my Skylite project. 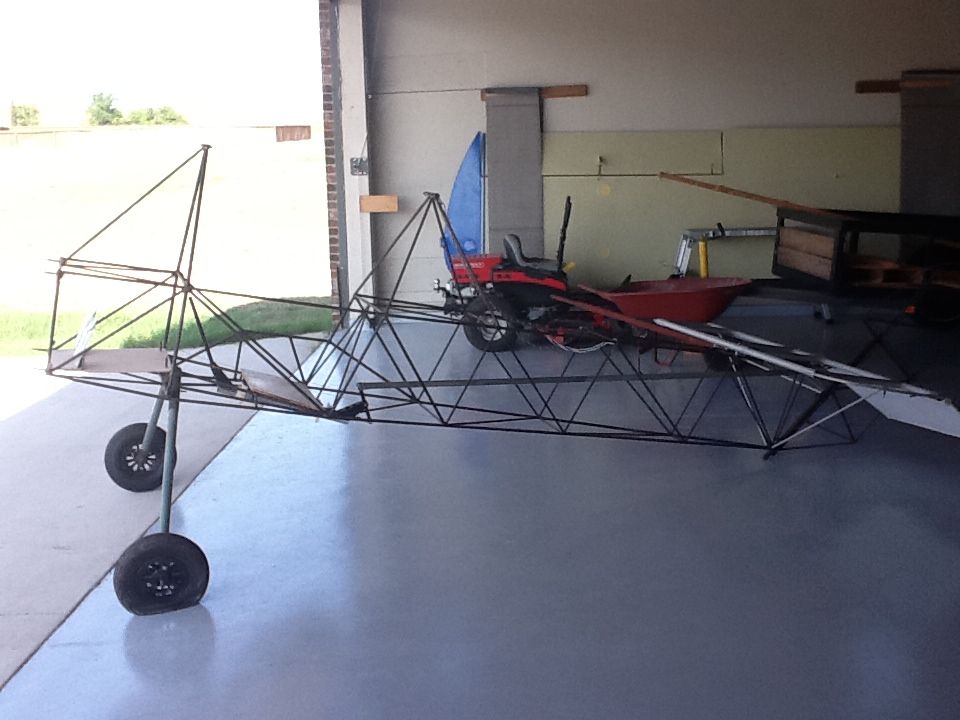 |
|
n3480h
Accomplished Member
Posts: 78
|
Post by n3480h on Sept 5, 2012 15:52:13 GMT -6
Nice clean airframe, Pete. You are lucky your's has the plans gear on it (instead of the 35 pound beast mine came with). Great looking Kitfox, too.
Tom
|
|
|
|
Post by raceair on Sept 5, 2012 19:35:38 GMT -6
Looks Good. Quite a bit has been done already....All the little tabs and such take time and patience, but you'll get it....Ed
|
|
n3480h
Accomplished Member
Posts: 78
|
Post by n3480h on Sept 5, 2012 19:58:52 GMT -6
Got my new fiberglass nose bowl laid up over a 4 day weekend. Also recut and reformed the aluminum lower side panels for the engine cowl, to fit the nosebowl. I riveted a double hinge on a narrow stringer to run between the top of the boot cowl and the top of the nosebowl, for the right and left top engine cowl doors. These doors will be formed from new .025 Alclad 2024-T3, piano hinged at the top(to the hinge stringer) and secured with two screws and nutplates at the bottom. Also made a new windscreen from the rounded bubble I cut off my Sonerai canopy. It fits the curve of the boot cowl and its positioned between the three front wing attach posts. Light weight, small, and sexy, but entirely sufficient. The nose of my Skylite now looks much more like a conventional 1930's airplane. Gear material is due here tomorrow and new fabric for the fuse will be ordered this week. I might be motivated.
Tom
|
|
|
|
Post by raceair on Sept 6, 2012 5:04:20 GMT -6
Tom, Great progress....Fuselage covering is fairly easy, as there is no stitching rivets. As with most small fuselages, I do it in three pieces, the bottom first, then one side, then the other. If you get the 'wider' uncertified 1.6 or 1.7 oz. dacron, you may be able to do the sides/top with one piece.....Ed
|
|
n3480h
Accomplished Member
Posts: 78
|
Post by n3480h on Sept 6, 2012 16:17:02 GMT -6
I see Polyfiber offers the 1.6 in 72", so I'll measure up the frame and see what I can get away with. It appears that the fuse stringers on this example are conduit, with several heavy layers of paint on them. I'll use hat section 2024-T3 stringers at 5 oz. per 8 foot length - and leave them unpainted.
Gear tubes arrived today, looks like I'll have to "shave" 2-3 thou off the inside tubes, but that's not a big deal.
Tom
|
|
Peteohms
Super Serious Member
Kitfox III
Posts: 113
|
Post by Peteohms on Sept 6, 2012 17:58:28 GMT -6
I see Polyfiber offers the 1.6 in 72", so I'll measure up the frame and see what I can get away with. It appears that the fuse stringers on this example are conduit, with several heavy layers of paint on them. I'll use hat section 2024-T3 stringers at 5 oz. per 8 foot length - and leave them unpainted. Gear tubes arrived today, looks like I'll have to "shave" 2-3 thou off the inside tubes, but that's not a big deal. Tom Tom, I've heard of aluminum screen frame extrusions being used for stringers. I wonder if they are heavier than the hat sections. |
|


 ).
).